SHOCO v2.1 - Developer Guide
By: Team SHOCOTech
Since: Feb 2020
Creators: Tan Kok Joon, Labi Trisha Angelica Vergara, Loh Ching Wei, Joshua, Phoon Jia Juin, Wong Jin En, Shannon
Table of Contents
- 1. Introduction
- 2. Overview of the SHOCO application
- 3. Implementation
- Appendix A: Product Scope
- Appendix B: User Stories
- Appendix C: Non-Functional Requirements
- Appendix D: Instructions for Manual Testing
1. Introduction
Purpose of this guide
This guide describes the software architecture and design of the SHOCO application. It will evolve throughout the design and implementation of each SHOCO release. Currently, this document is for the third public release of the application, SHOCO v2.1.
Scope of this guide
This document describes the software architecture and design for the implementation of SHOCO and is tailored for the developers, designers, and software testers of SHOCO.
2. Overview of the SHOCO application
The overview of the main classes in the application are shown in the class diagram below.
Omitted are the classes for the features implemented, the LoadData
class, WriteData class, FileUtil class and
CommandLineTable class.
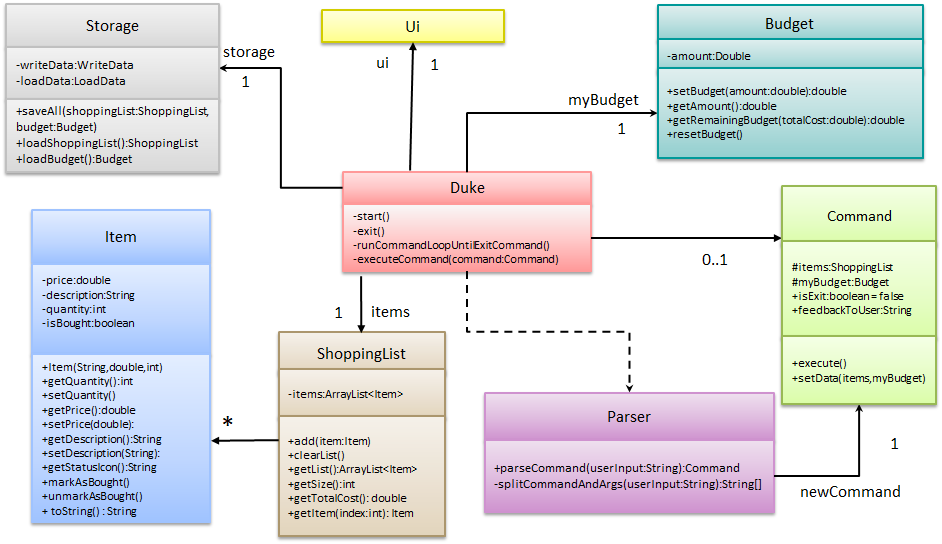
The Duke class manages all required resources in the execution of the application. These include
a ShoppingList object to keep track of the Item objects the user has added to his list and
a Budget object to store the user’s budget.
Duke also has a Storage object for saving and loading data from the disk - this data is stored as JSON files
and consists of the latest saved ShoppingList and Budget.
There is a dependency from Duke to Parser as it only creates an instance of the Parser
every time user input is received by the Ui and does not keep track of the Parser which is deleted
after it is done parsing the current user input. The Parser determines what command is being invoked by the
user before creating a new Command object. It then returns the reference to the new Command object
to Duke.
At any point in time, Duke only stores up to one Command and no more. This
Command has to be executed before Duke can receive more user input.
3. Implementation
This section will describe how the main features of the application are implemented.
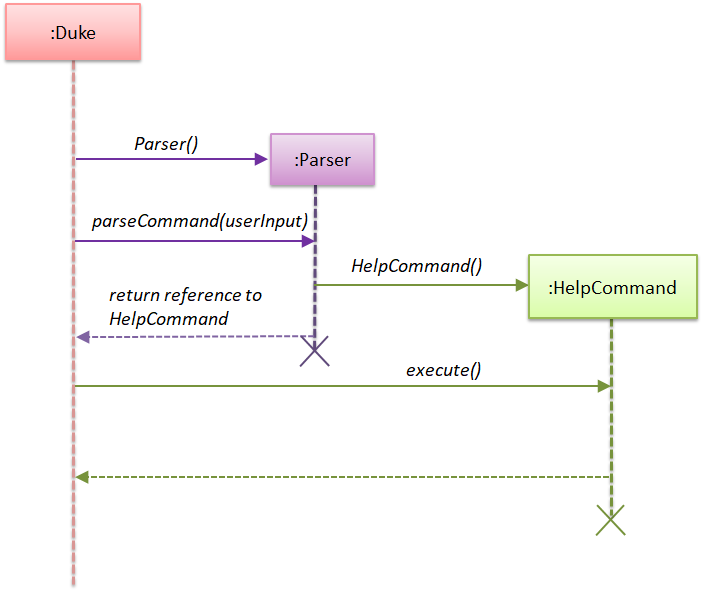
3.1 View help feature
3.1.1 Current implementation
The help feature is implemented using a HelpCommand class which extends the main
Command class. The HelpCommand class shows the program usage instructions to the user.
The process is as follows:
-
Dukereceives user input fromUi. -
DukecallsParser#parseCommand(). If the user input fails to match any of the correct command keywords (ADD,EDIT,DELetc.), or if the input matches theHELPcommand keyword, aHelpCommandobject will be instantiated. -
DukecallsHelpCommand#execute(). -
HelpCommand#execute()lists all the accepted command format SHOCO recognizes, their purpose and 1 or more examples of usage.
The following sequence diagram below shows how the help feature works. Note, the Ui class is
omitted in the sequence diagram to emphasise on the other classes:
3.1.2 Design considerations
Aspect: Data structure to support the help feature
-
Alternative 1 (current choice): Object-oriented style with a separate class for
HelpCommand-
Pros: Easy to add the help feature without having to change the logic of the code much as each command object is treated as a black box
-
Cons: Might significantly increase the code base with another class being added
-
-
Alternative 2: Implement help feature in the
DukeorParserclass-
Pros: Will have less code to deal with as a new method is simply created in the
Dukeclass -
Cons: Code becomes less organised since for every other command that we have implemented,
Dukeclass simply executes those commands as black boxes, without worrying about their internal details
-
Reason for choosing alternative 1: By abstracting out different command types as separate classes, we could work better in parallel and also be able to spot bugs more easily as each class deals with a different functionality
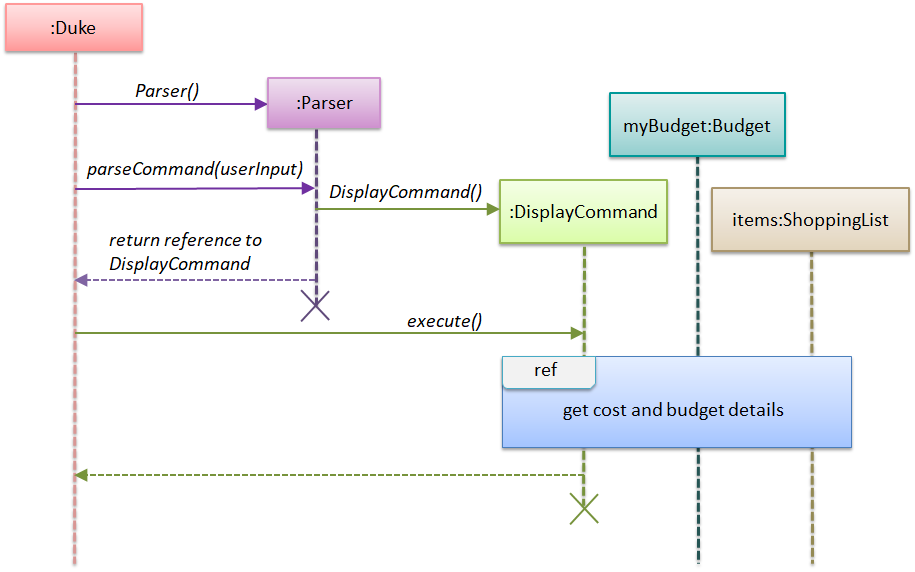
3.2 Display feature
This feature involves displaying the shopping list and budget details to the user.
3.2.1 Current implementation
The display feature is implemented using a DisplayCommand class which extends the Command
class.
The process is as follows:
-
Dukereceives user input fromUi. -
DukecallsParser#parseCommand()to instantiate aDisplayCommandobject based on that user input. -
Dukethen callsDisplayCommand#execute(). -
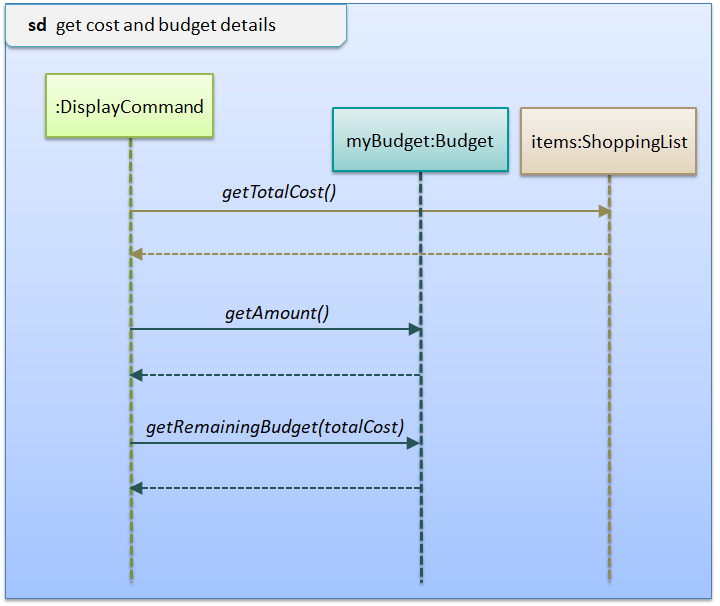
DisplayCommand#execute()makes a call toShoppingList#getTotalCost()to find the cost of the items. -
DisplayCommand#execute()then callsBudget#getAmount()andBudget#getRemainingBudget()to find the current budget and the remaining budget. - The results are then printed to console.
The following sequence diagrams below show how the display feature works. Note the Ui class is
omitted to emphasise the other classes:
3.2.2 Design considerations
Aspect: Data structure to support the display feature
-
Alternative 1 (current choice): Object-oriented style with a separate class for
DisplayCommand-
Pros: Easy to add the display feature without having to change the logic of the code much as each command object is treated as a black box
-
Cons: Might significantly increase the code base with another class being added
-
-
Alternative 2: Implement display feature in the
Dukeclass-
Pros: Will have less code to deal with as a new method is simply created in the
Dukeclass -
Cons: Handling the command under the
Dukeclass results in longer methods. Thus, the code becomes harder to navigate and understand.
-
Reason for choosing alternative 1: With each command type having its own class, we could work better in parallel and also be able to trace functionality bugs more easily if each command class deals with its own functionality.
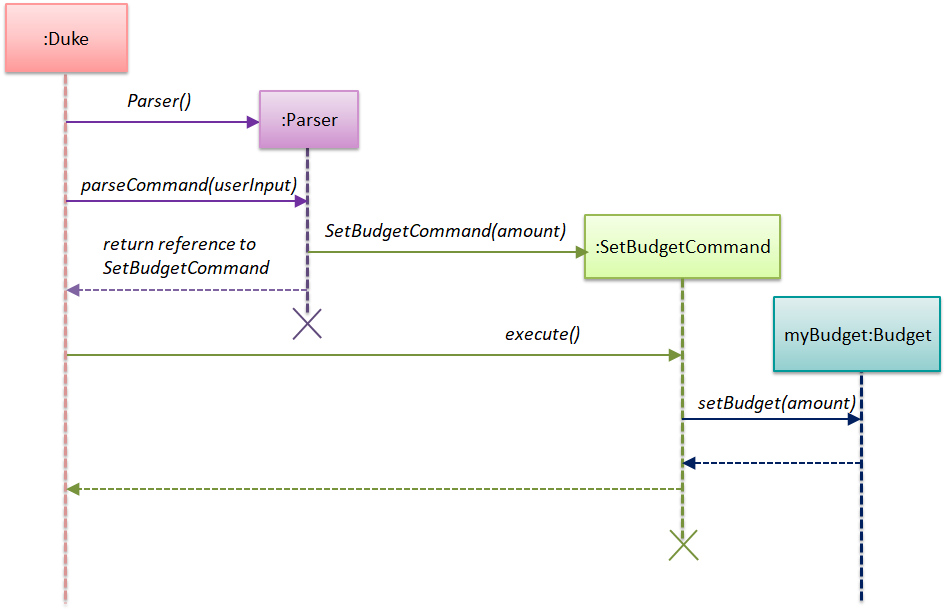
3.3 Set budget feature
3.3.1 Current implementation
The set budget feature is implemented using a SetBudgetCommand class which extends the main
Command class with a variable representing the budget amount.
The process is as follows:
-
Dukereceives user input fromUi. -
DukecallsParser#parseCommand()to instantiate aSetBudgetCommandobject based on that user input. -
Dukethen callsSetBudgetCommand#execute(). -
SetBudgetCommand#execute()makes another call toBudget#setBudget(). - The amount in the
Budgetobject is set to the amount specified by the user.
The following sequence diagram below shows how the set budget feature works. Note the Ui class is
omitted in the sequence diagram to emphasise on the other classes:
3.3.2 Design considerations
Aspect: Data structure to support the set budget feature
-
Alternative 1 (current choice): Object-oriented style with a separate class for
SetBudgetCommand-
Pros: Easy to add the set budget feature without having to change the logic of the code much as each command object is treated as a black box
-
Cons: Might significantly increase the code base with another class being added
-
-
Alternative 2: Implement set budget feature in the
Dukeclass-
Pros: Will have less code to deal with as a new method is simply created in the
Dukeclass -
Cons: Code becomes less organised since for every other command that we have implemented,
Dukeclass simply executes those commands as black boxes, without worrying about their internal details
-
Reason for choosing alternative 1: By implementing each command type in a separate class, any bugs associated with a particular functionality will not affect other functionalities that significantly. It would also make it easier for us to work in parallel.
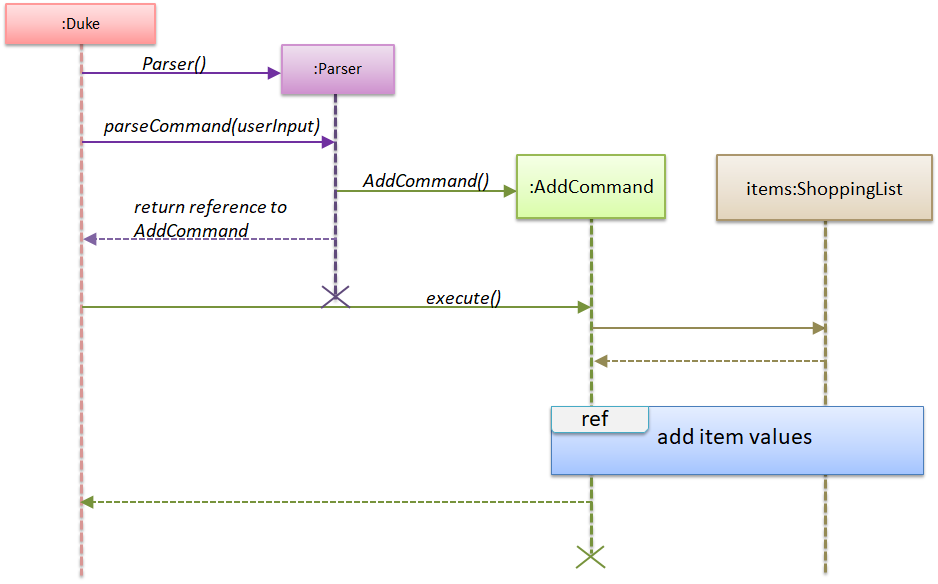
3.4 Add feature
3.4.1 Current implementation
The add feature is implemented using an AddCommand class. This class extends from the main
Command class. The user input must contain at least a description out of these parameters:
description, price, quantity. User can choose not to input price or quantity as the price will set to
default which is 0.0 if the user did not input any value for price. On the other hand, quantity will set to
default which is 1 if the user did not input any value for quantity.
The process is as follows:
-
Dukeclass receives user input from theUiclass. - A
Parserobject is created to call itsparseCommandmethod.- The
Parserobject instantiates anAddCommandobject based on the user input.
- The
- The
Dukeclass calls theAddCommand#execute()method of theAddCommandobject. - In the
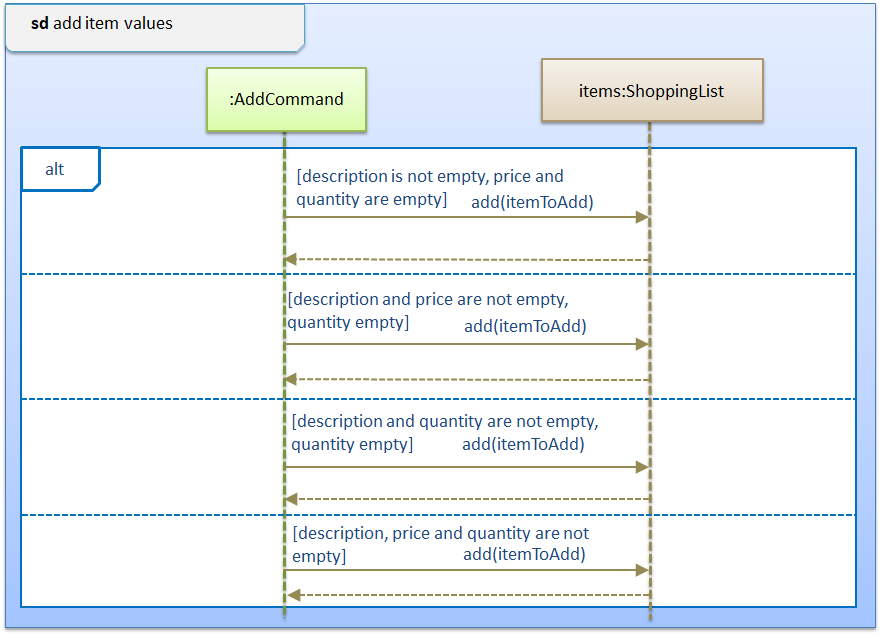
AddCommand#execute()method, theItemto be added is stored in theShoppingListobject, usingShoppingList#add()method. - In the sequence diagram,
AddCommandwill addItemif the description is provided. - The
Itemobject is stored into theShoppingListobject.
The following sequence diagram below shows how the add feature works. The details of adding item’s values are shown in a separate sequence diagram below:
3.4.2 Design considerations
Aspect: Data structure to support the add feature
- Alternative 1 (current choice): User must provided a description for item, duplicates are
not allowed in the list.
-
Pros: User has minimal potential to see unreasonable list in the Shopping List. For example, having a item that has only price and quantity but without description and also a list that one item is recorded multiple times in the list.
-
Cons: Will significantly increase the code base as there is a need to check for the presence of the variable in user input to avoid duplication, not user-friendly in certain scenario (eg: user wants to have duplicates because the item is for different occasion and the user wants to record down twice without any elaboration).
-
-
Alternative 2: Require user to provide all three values to successfully add the item into the list. Duplicates are allowed
-
Pros: User will have a neat and unity Shopping list, dealing less with parameter (because users are forced to give all three variables). The duplicates item are useful in certain specific condition.
-
Cons: User flexibility will decrease, because user must input all parameters even if he/she does not want to provide certain variables such as price and quantity, which will result unsuccessful adding items into the list. Also, duplicate items may confuse the user, even though in some specific scenario, duplicate item may be useful to the user.
-
Reasons for choosing Alternative 1: By allowing user to just add the item without price, we can increase the flexibility. For instance, the user wants to buy milk but not sure how much does the milk cost and not sure how many milk they want to buy. So they can just add it into the list, and edit the price and quantity later when they knew the price and have decided the quantity.
3.5 Edit feature
3.5.1 Current implementation
The edit feature is implemented using an EditCommand class. This class extends from the main
Command class. The Item object to be edited is identified by the index number provided
in the user input. In addition to the index number, the user input must also contain at least one of these parameters:
description, price, quantity.
The process is as follows:
-
Dukeclass receives user input from theUiclass. - A
Parserobject is created. -
DukecallsParser#parseCommand()method to instantiate anEditCommandobject based on the user input. -
Dukeclass calls theEditCommand#execute()method. - In the
EditCommand#execute()method, theItemobject is retrieved throughShoppingList#getItem(). The original description / price / quantity of the item is overwritten with the new values from the user input through the use of theItemclass setter methods. - The
Itemobject with its new values is stored back to theShoppingListobject.
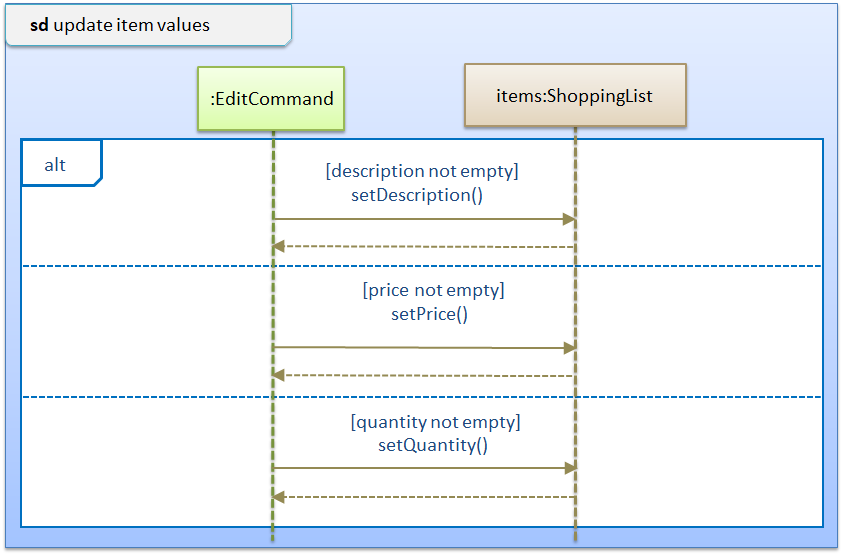
The following sequence diagram below shows how the edit feature works. The details of updating the values of an item have been omitted from the diagram. Those details are shown in a separate sequence diagram.
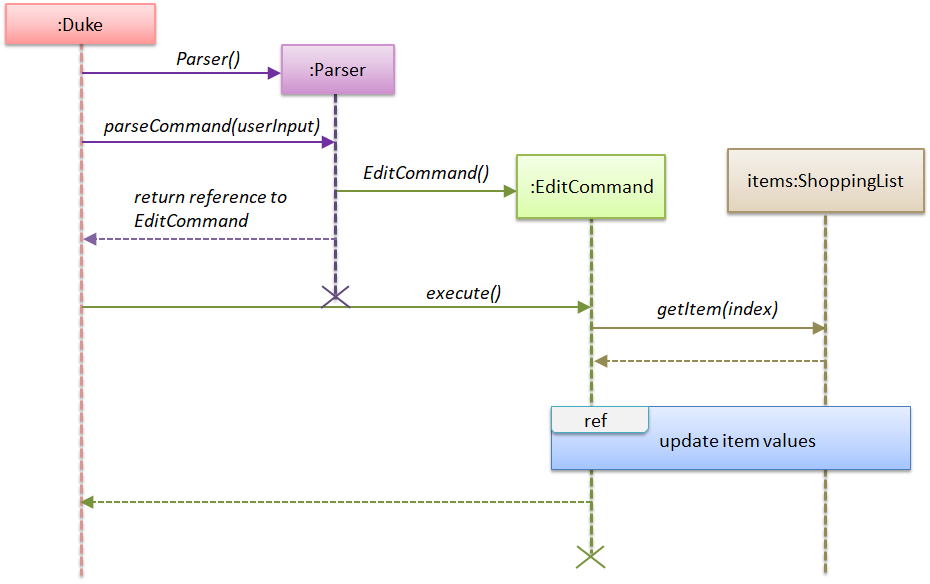
The separate sequence diagram below shows how an item is updated with new values.
3.5.2 Design considerations
Aspect: Data structure to support the edit feature
-
Alternative 1 (current choice): Only parameters present in user input are treated as values to update.
-
Pros: User has the flexibility to choose which variables he/she wishes to update.
-
Cons: Might significantly increase the code base as there is a need to check for the presence of the variable in user input.
-
-
Alternative 2: Require all values of an
Itemobject to be updated and parameters must be in alphabetical order.-
Pros: Will have less code to deal with having no additional parsing of the input string.
-
Cons: Less user flexibility; user must input all parameters even if he/she does not wish to update certain variables.
-
Reason for choosing alternative 1: By allowing users to update any values they want, it provides them with greater convenience and freedom as they do not need to follow strict command “rules/order”. Furthermore, having greater freedom on input values makes it a hassle-free process for the users.
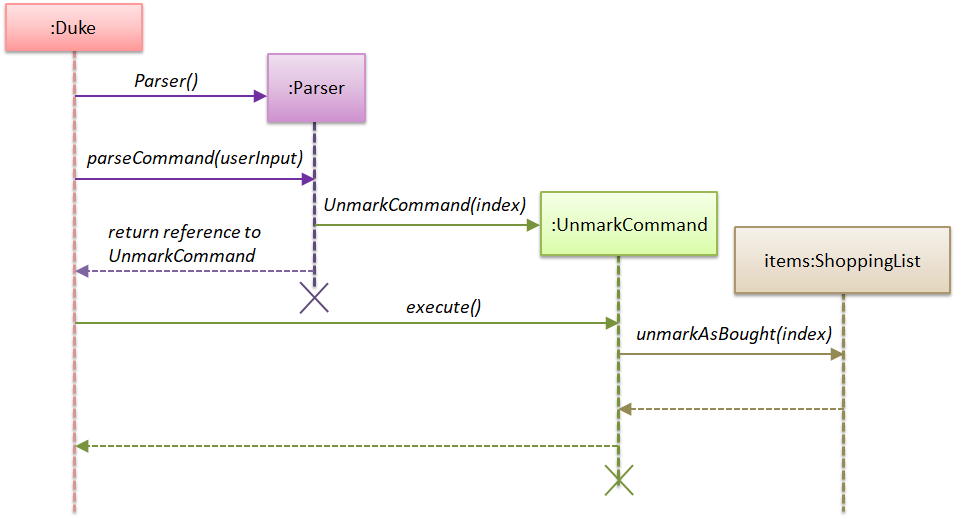
3.6 Mark and Unmark feature
3.6.1 Current Implementation
The mark and unmark feature is implemented using the MarkCommand and UnmarkCommand class
which extends the main Command class with an index representing that of the item to be marked or
unmarked as bought in the list.
The process is as follows:
-
Dukefirst receives user input fromUi -
Dukecreates aParserobject and calls itsParser#parseCommand()method to instantiate aMarkCommand/UnmarkCommandobject based on the user input -
Dukethen calls theMarkCommand#execute()/UnmarkCommand#execute()method. -
MarkCommand#execute()/UnmarkCommand#execute()makes a call to theShoppingList#markAsBought()/ShoppingList#unmarkAsBought()method with the specified index.
The following sequence diagram below shows how the Mark feature (Diagram 1) and Unmark feature (Diagram 2) works.
Note the Ui class is omitted in the sequence diagram to emphasise on the other classes:
Diagram 1:
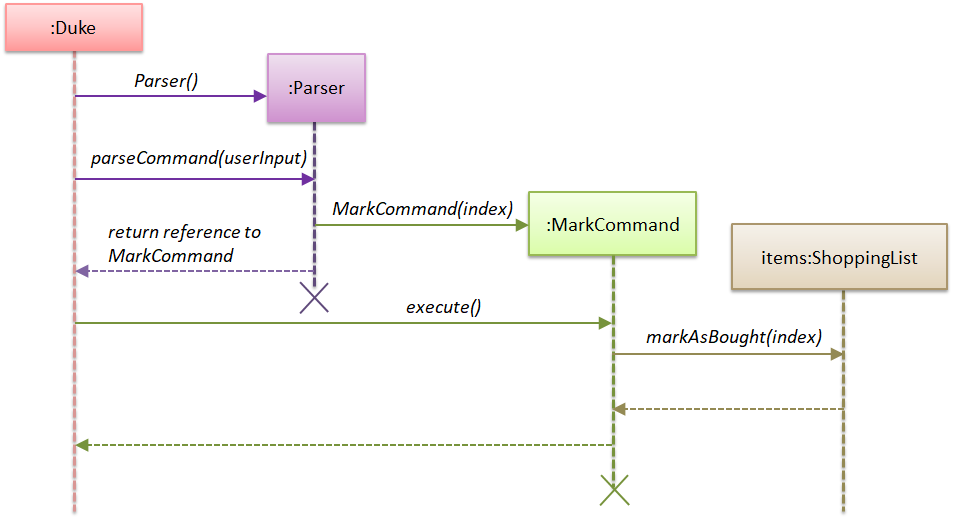
Diagram 2:
3.6.2 Design Considerations
Aspect: Data structure to support the Mark and Unmark Feature
-
Alternative 1 (current choice): Object-oriented style with a separate class for
MarkCommandandUnmarkCommand-
Pros: Easy to edit and add the mark and unmark feature without having to change the logic of the code in multiple files
-
Cons: Might significantly increase the code base with another class being added
-
-
Alternative 2: Implement the mark and unmark feature in either the
DukeorParserclass-
Pros: Will have less code and classes to deal with, without having to create a whole new object to execute the command.
-
Cons: Code becomes harder to navigate and understand since the command is all handled under one class, thus makes having to edit the mark and unmark feature difficult.
-
Reasons for choosing alternative 1: By having an individual class on it’s own, any bugs found in the mark and unmark feature can be found easier and therefore helps to resolve the issue more efficiently. Also, with the feature being implemented in an object-oriented style, reading and tracing the application code would be easier, thus making adding future features to the mark and unmark feature easier as well.
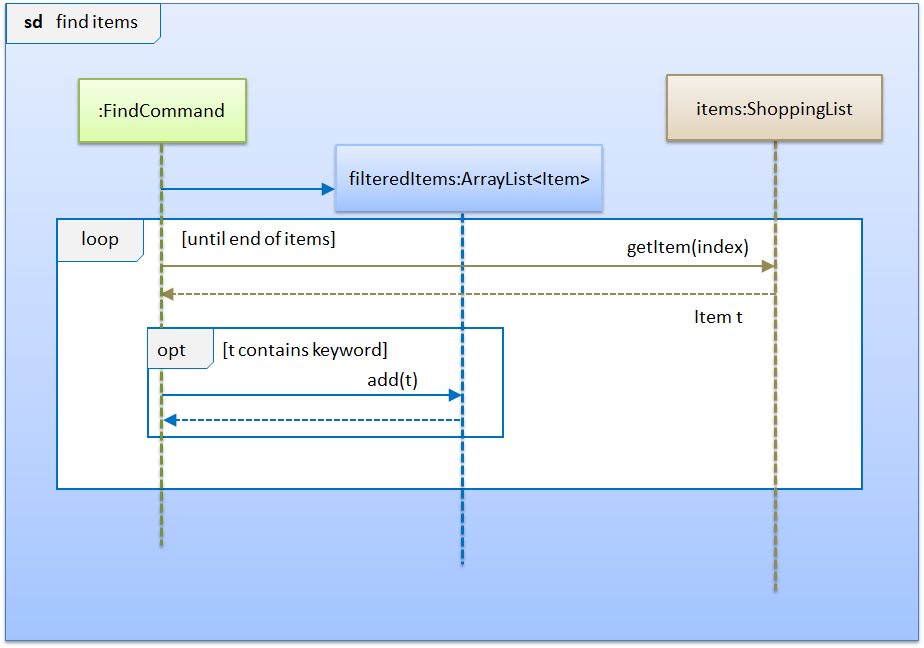
3.7 Find feature
3.7.1 Current implementation
The find feature is implemented using a FindCommand class which extends the main
Command class with a String representing the keyword specified by the user.
The process is as follows:
-
Dukereceives user input fromUi. -
DukecallsParser#parseCommand()to instantiate aFindCommandobject based on that user input. -
Dukethen callsFindCommand#execute(). -
FindCommand#execute()makes various calls toShoppingList#getItem()to check whether theItemat each specified index contains the given keyword. - Each
Itemthat contains the keyword is then added to a newArrayListnamedfilteredItemsthat is maintained by theFindCommandobject. - This list of matching results is then printed to standard output.
The following sequence diagram below shows how the Duke object creates the FindCommand object.
Note the Ui class is omitted in the sequence diagram to emphasise on the other classes:
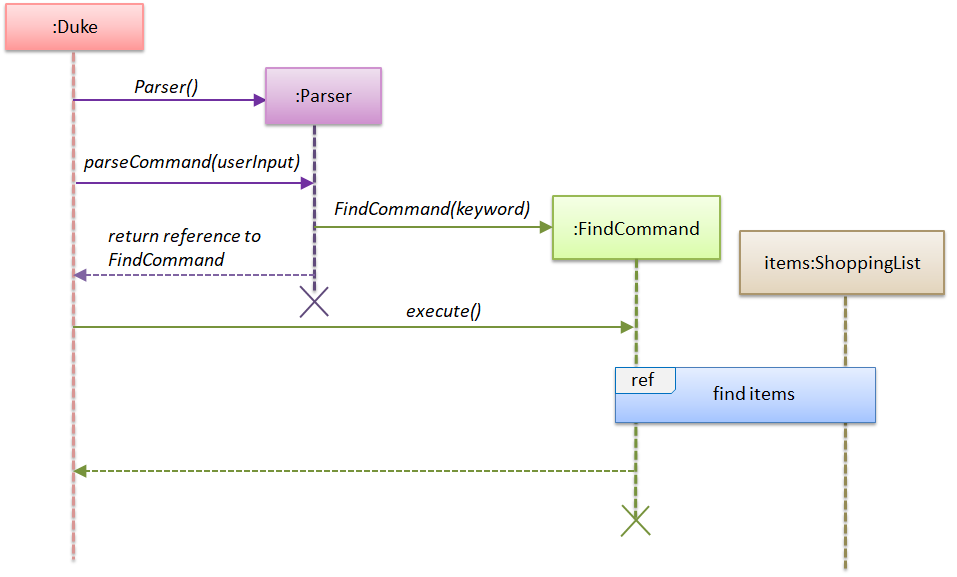
This next sequence diagram will show how the FindCommand creates the filteredItems list:
3.7.2 Design considerations
Aspect: Data structure to support the find feature
-
Alternative 1 (current choice): Object-oriented style with a separate class for
FindCommand-
Pros: Easy to add the find feature without having to change the logic of the code much as each command object is treated as a black box
-
Cons: Might significantly increase the code base with another class being added
-
-
Alternative 2: Implement find feature in the
Dukeclass-
Pros: Will have less code to deal with as a new method is simply created in the
Dukeclass -
Cons: Code becomes less organised since for every other command that we have implemented,
Dukeclass simply executes those commands as black boxes, without worrying about their internal details
-
Reason for choosing alternative 1: With each command type having its own class, we could work better in parallel and also be able to trace functionality bugs more easily if each command class deals with a different functionality.
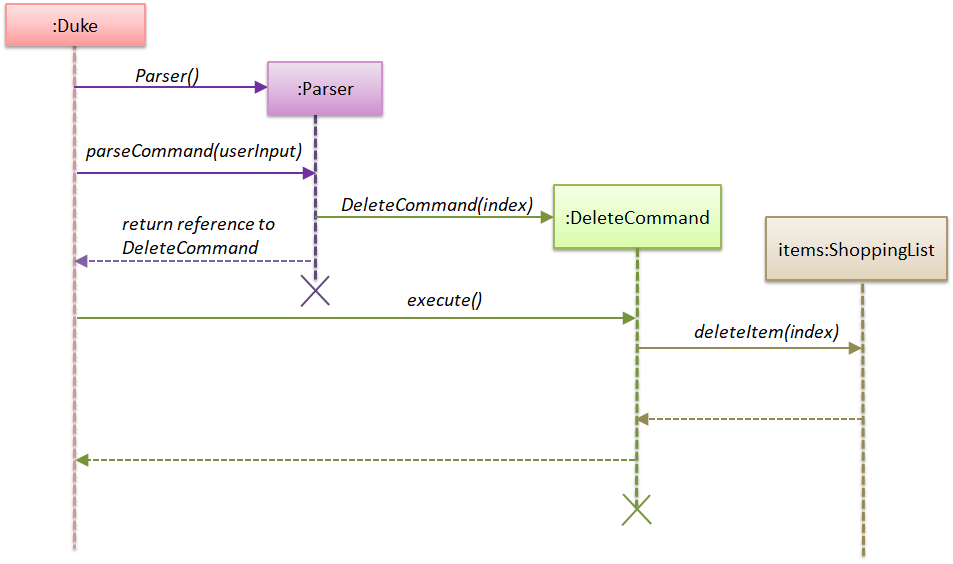
3.8 Delete feature
3.8.1 Current implementation
The delete feature is implemented using a DeleteCommand class which extends the main
Command class with an index representing that of the item to be deleted from the shopping
list.
The process is as follows:
-
Dukereceives user input fromUi. -
DukecallsParser#parseCommand()to instantiate aDeleteCommandobject based on that user input. -
Dukethen callsDeleteCommand#execute(). -
DeleteCommand#execute()makes another call toShoppingList#deleteItem(). - The
Itemat the specified index is then removed from theShoppingListobject.
The following sequence diagram below shows how the delete feature works. Note the Ui class is
omitted in the sequence diagram to emphasise on the other classes:
3.8.2 Design considerations
Aspect: Data structure to support the delete feature
-
Alternative 1 (current choice): Object-oriented style with a separate class for
DeleteCommand-
Pros: Easy to add the delete feature without having to change the logic of the code much as each command object is treated as a black box
-
Cons: Might significantly increase the code base with another class being added
-
-
Alternative 2: Implement delete feature in the
Dukeclass-
Pros: Will have less code to deal with as a new method is simply created in the
Dukeclass -
Cons: Code becomes less organised since for every other command that we have implemented,
Dukeclass simply executes those commands as black boxes, without worrying about their internal details
-
Reason for choosing alternative 1: By abstracting out different command types as separate classes, this allowed us to work better in parallel and also be able to spot bugs more easily as each class deals with a different functionality.
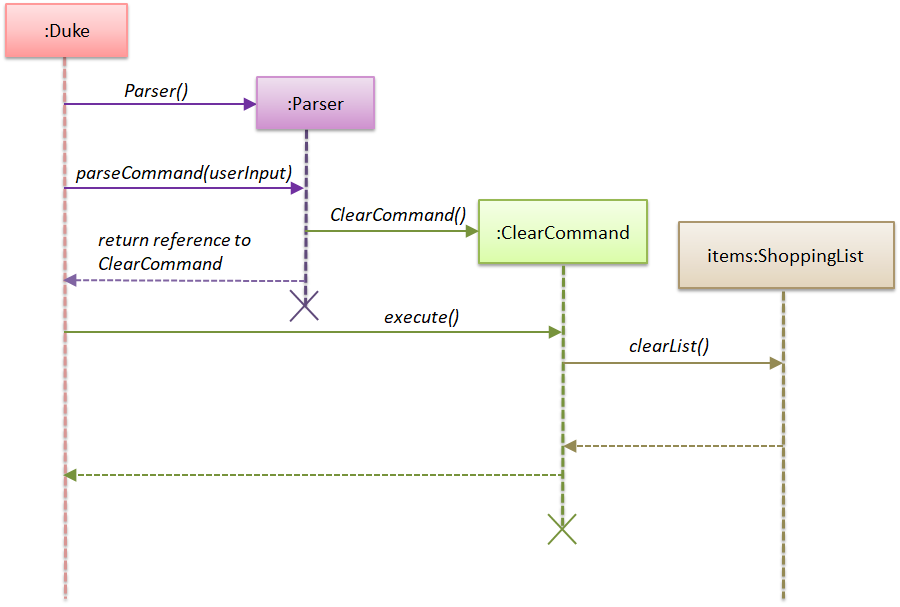
3.9 Clear list feature
This feature involves clearing all items in the shopping list.
3.9.1 Current implementation
The clear list feature is implemented using a ClearCommand class which extends the Command
class.
The process is as follows:
-
Dukereceives user input fromUi. -
DukecallsParser#parseCommand()to instantiate aClearCommandobject based on that user input. -
Dukethen callsClearCommand#execute(). -
ClearCommand#execute()makes a call toShoppingList#clearList().
The following sequence diagram below shows how the clear list feature works. Note the Ui class is
omitted to emphasise the other classes:
3.9.2 Design considerations
Aspect: Data structure to support the clear list feature
-
Alternative 1 (current choice): Object-oriented style with a separate class for
ClearCommand-
Pros: Easy to add the clear list feature without having to change the logic of the code much as each command object is treated as a black box
-
Cons: Might significantly increase the code base with another class being added
-
-
Alternative 2: Implement clear list feature in the
Dukeclass-
Pros: Will have less code to deal with as a new method is simply created in the
Dukeclass -
Cons: Handling the command under the
Dukeclass results in longer methods. Thus, the code becomes harder to navigate and understand.
-
Reason for choosing alternative 1: With each command type having its own class, we could work better in parallel and also be able to trace functionality bugs more easily if each command class deals with a different functionality.
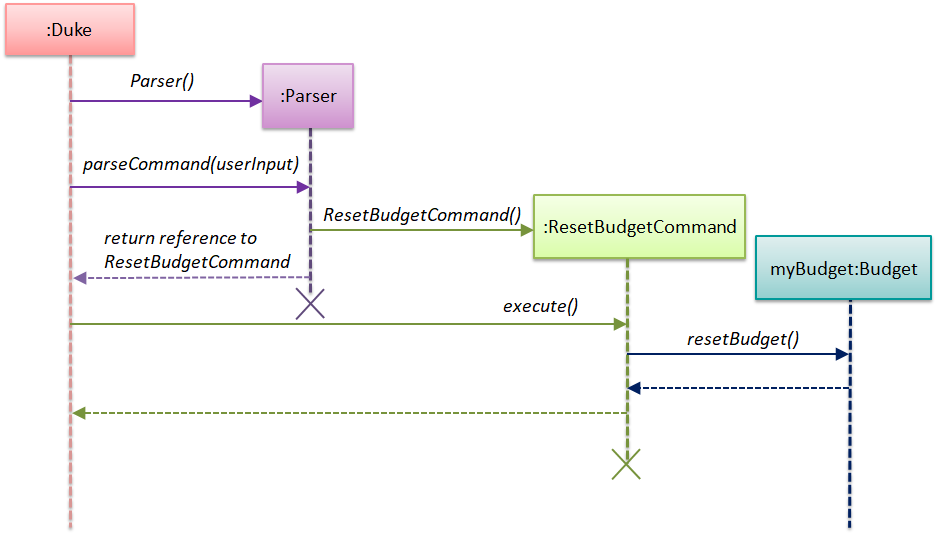
3.10 Reset budget feature
3.10.1 Current implementation
The reset budget feature is implemented using a ResetBudgetCommand class which extends the main
Command class with a variable representing the budget amount.
The process is as follows:
-
Dukefirst receives user input from theUiclass. -
Dukecreates aParserobject and callsParser#parseCommand()method to instantiate aResetBudgetCommandobject based on that user input. -
Dukethen calls theResetBudget#execute()method. -
ResetBudget#execute()makes a call to theBudget#resetBudget()method to set the existing budget to $0.00.
The following sequence diagram below shows how the reset budget feature works. Note the Ui class is
omitted in the sequence diagram to emphasise on the other classes:
3.10.2 Design considerations
Aspect: Data structure to support the reset budget feature
-
Alternative 1 (current choice): Object-oriented style with a separate class for
ResetBudgetCommand.-
Pros: Easy to add the reset budget feature without having to change the logic of the code much as each command object is treated as a black box.
-
Cons: Might significantly increase the code base with another class being added.
-
-
Alternative 2: Implement reset budget feature in the
DukeorParserclass.-
Pros: Will have less code to deal with as a new method is simply created in the
Dukeclass. -
Cons: Code becomes less organised since for every other command that we have implemented,
Dukeclass simply executes those commands as black boxes, without worrying about their internal details.
-
Reason for choosing alternative 1: By implementing each command type in a separate class, any bugs associated with a particular functionality will not affect other functionalities that significantly. It would also make it easier for us to work in parallel.
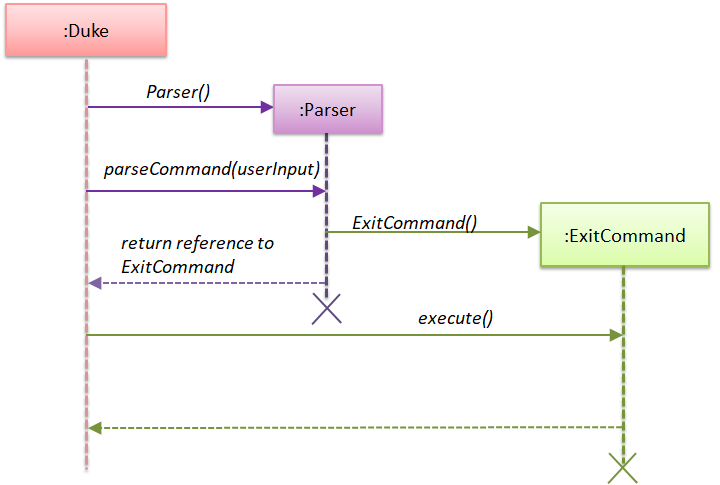
3.11 Exit program feature
3.11.1 Current implementation
The program termination feature is implemented using an ExitCommand class which extends the main
Command class. The ExitCommand class terminates the program when instantiated.
-
Dukeclass receives user input from theUiclass. -
DukecallsParser#parseCommand()to instantiate aExitCommandobject based on that user input. -
Dukethen calls theExitCommand#execute()method of the - The program is terminated.
The following sequence diagram below shows how the exit feature works. Note the Ui class is
omitted in the sequence diagram to emphasise on the other classes:
3.11.2 Design considerations
Aspect: Data structure to support the exit feature
-
Alternative 1 (current choice): Object-oriented style with a separate class for
ExitCommand-
Pros: Easy to add the exit feature without having to change much of the code logic as each command object is treated as a black box
-
Cons: Might significantly increase the code base with another class being added
-
-
Alternative 2: Implement exit feature in the
DukeorParserclass-
Pros: Will have less code to deal with as a new method is simply created in the
Dukeclass -
Cons: Code becomes less organised since for every other command that we have implemented,
Dukeclass simply executes those commands as black boxes, without worrying about their internal details
-
Reason for choosing alternative 1: By abstracting out different command types as separate classes, we could work better in parallel and also be able to spot bugs more easily as each class deals with a different functionality
Appendix A: Product Scope
This section talks about who this product is specially designed for and what it aims to achieve.
Target user profile
- Likes to cook at home and requires help keeping track of complex grocery shopping lists and staying within budget
- Prefers to use command line interface applications as opposed to other kinds of applications or paper
- Can type fast
Value proposition
- Make grocery shopping a breeze by offering greater flexibility in managing shopping lists and also providing helpful features like budget tracking
Appendix B: User Stories
This section contains the user stories for the different versions of our product.
| Version | As a … | I want to … | So that I can … |
|---|---|---|---|
| v1.0 | organised home cook | be able to add items to the list | manage the list better |
| v1.0 | organised home cook | be able to edit my budget | change my budget when I need to |
| v1.0 | organised home cook | delete items from the list | manage my list |
| v1.0 | organised home cook | have a useful “help” list that I can refer to | find instructions for various commands |
| v1.0 | frugal home cook | add a budget | so that I know how much I have to spend |
| v1.0 | organised home cook | mark things as bought | keep track of my grocery progress |
| v1.0 | frugal home cook | be able to clear my budget | set a new budget |
| v1.0 | frugal home cook | be able to see the total value of the items in my shopping list | know that I am within budget |
| v1.0 | frugal home cook | see the remaining budget that I have left | avoid exceeding my budget |
| v1.0 | practical home cook | be able to clear all items from the list with one command | easily start off with a clean slate |
| v1.0 | practical home cook | see all items on my list | see at a glance what I have planned to buy |
| v1.0 | frugal home cook | see my budget | know if I’m within or out of my budget |
| v1.0 | frugal home cook | calculate my remaining budget | see how much I have left to spend |
| v2.0 | frugal home cook | be notified when I cross my budget | remove some items from my list |
| v2.0 | practical home cook | be able to search for items on my list | find things easily in a long list |
| v2.0 | practical home cook | be able to edit the items in my lists | keep my shopping list up to date |
| v2.0 | organised home cook | save my list | have a local copy of my list |
| v2.0 | organised home cook | load my saved list | add on to my existing list |
| v2.0 | frugal home cook | see the remaining budget update based on the quantity of items | see how much I spend based on how much I buy |
Appendix C: Non-Functional Requirements
- Should work on any OS that has Java 11 or later installed.
- Should respond to any user commands within 2 seconds.
- Should be easy to use even for people who have never used a command line interface before.
Appendix D: Instructions for Manual Testing
Note: These instructions only provide a starting point for testers to work on; testers are expected to do more exploratory testing.
Launch and Shutdown
-
Initial launch
i. Download the latest version of
SHOCO, namedCS2113T-T13-1.Shoco.jarunder version 2.1.ii. Copy it into an empty folder on your desktop.
iii. While inside the empty folder, open a command prompt window by typing
CMDin the address bar of the folder.iv. Run the following command in the command prompt window:
java -jar CS2113T-T13-1.Shoco.jar Tip: If the font size of the terminal is too big, you can decrease it by
 CTRL + scroll downon your mouse.Expected: Shows a welcome message from SHOCO. -
Shutdown
i. Enter the command
BYEto exit the SHOCO application.Expected: The program is terminated.
Set and Reset a budget
-
Set a budget
i. Test case:
SET b/500.00Expected: Budget is set to $500.00ii. Test case:
SET b/10000Expected: Budget is set to $5000.00, which is the maximum budget SHOCO allows.iii. Test case:
SET b/-100Expected: Budget is reset to $0.00, which is the minimum budget SHOCO allows.iv. Other incorrect set budget commands to try:
SET b/xxx(where xxx is not a number).Expected: An error message and the correct usage of the SET command is shown. -
Reset the budget
i. Test case:
RESExpected: Budget has been reset to $0.00ii. Other incorrect reset budget commands to try:
RES xxx(where xxx is not a number).Expected: An error message and the correct usage of the RES command is shown.
Add and Edit an item
-
Add an item
Tip: Before adding an item, you can run the DISPLAYcommand to prevent entering a duplicate descriptioni. Test case:
ADD i/apple p/3.00 q/2Expected: An item with the description - "apple", price - "$3.00" and quantity - "2" is added. Tip: You can run the DISPLAYcommand to check the newly added item.ii. Test case:
ADD p/3.00Expected: No item is added. Error message and a correct usage of the ADD command is shown.iii. Other incorrect ADD commands to try:
ADD,ADD p/xxx,ADD q/xxx(where xxx is not a number).Expected: Similar to previous. -
Edit an item
Tip: You can run the DISPLAYcommand to check if the item has been correctly updated.Assumption: Valid index and description is provided. (No duplicate description allowed)
i. Test case:
EDIT 1 i/bananaExpected: The description of the first item is updated to "banana".ii. Test case:
EDIT 1 p/5.60Expected: The price of the first item is updated to "$5.60".iii. Test case:
EDIT 1 q/3Expected: The quantity of the first item is updated to "3".iv. Other incorrect edit commands to try:
EDIT p/xxx,EDIT q/xxx. (where xxx is not a number).Expected: An error message and the correct usage of the EDIT command is shown.
Mark and Un-mark an item
-
Marking an item
Assumption: there are more than 5 but less than a hundred items in the list.
i. Test case:
MARK 5Expected: The fifth item in the list is mark as bought, denoted as [B].ii. Test case:
MARK -10Expected: An error message stating that the item does not exist in the list is shown.iii. Test case:
MARK 100Expected: An error message stating that the item does not exist in the list is shown.iv. Other incorrect MARK commands to try:
MARK xxx(where xxx is not a number).Expected: An error message stating to provide a single numerical index number is shown. -
Un-marking an item
Assumption: there are more than 5 and less than a hundred items in the list.
i. Test case:
UNMARK 5Expected: The fifth item in the list is marked as not bought yet, denoted as [X].ii. Test case:
UNMARK -10Expected: An error message stating that the item does not exist in the list is shown.iii. Test case:
UNMARK 100Expected: An error message stating that the item does not exist in the list is shown.iv. Other incorrect UNMARK commands to try:
UNMARK xxx(where xxx is not a number).Expected: An error message stating to provide a single numerical index number is shown.
Find and Delete an item
-
Find an item based on keyword
i. Test case:
FIND appleExpected: A list of items that contains "apple" in their description is displayed.ii. Test case:
FIND xxx(where xxx is a keyword that is unmatched)Expected: An error message and the correct usage of the FIND command is shown. -
Delete an item
Tip: You can run the DISPLAYcommand to check the index of an item.i. Test case:
DEL 1Expected: The first item (if it exists), is deleted.ii. Test case:
DEL xxx(where xxx is a not a number / the item does not exist yet)Expected: An error message and the correct usage of the DEL command is shown.
Display and Clear the shopping list
-
List all items in the shopping list
i. Test case:
DISPLAYExpected: A list of all the items and the current budget amount is displayed. -
Clear all items in the shopping list
i. Test case:
CLEARExpected: The shopping list is cleared.